
If you're interested in finding out where new houses are being built in established neighborhoods of Toronto, this can be hard to look up unless you're aware of all the builders out there. Unlike resale homes that are listed on MLS, there isn't an equivalent online database for new construction homes that you can easily search. Although some builders do list their current construction homes on MLS, not all do. A well-connected real estate agent in your desired neighborhood may have some insight, but may not be aware of all the ongoing projects either.
Start by looking up active building permits in Toronto
Another approach is to look up active building permits. This way, you can get a sense of addresses currently undergoing construction. The results won't indicate if the house being built is for sale, but it's a good start for you to inquire with the builder directly based on the contact info found on the "Residential Infill Notice".
As you know from our earlier blog on building permits, the City of Toronto has a lookup tool where you can search for active building permits by ward. For example, if you're interested in Mimico, select the dropdown value "Ward 3: Etobicoke-Lakeshore".
You can see that a search for Ward 3 returned 3,395 addresses, but only 10 addresses are displayed per page. You have to click on each address to see the type of building permits issued and then click through all 340 pages. This means your fingers would have to click 3,735 times!
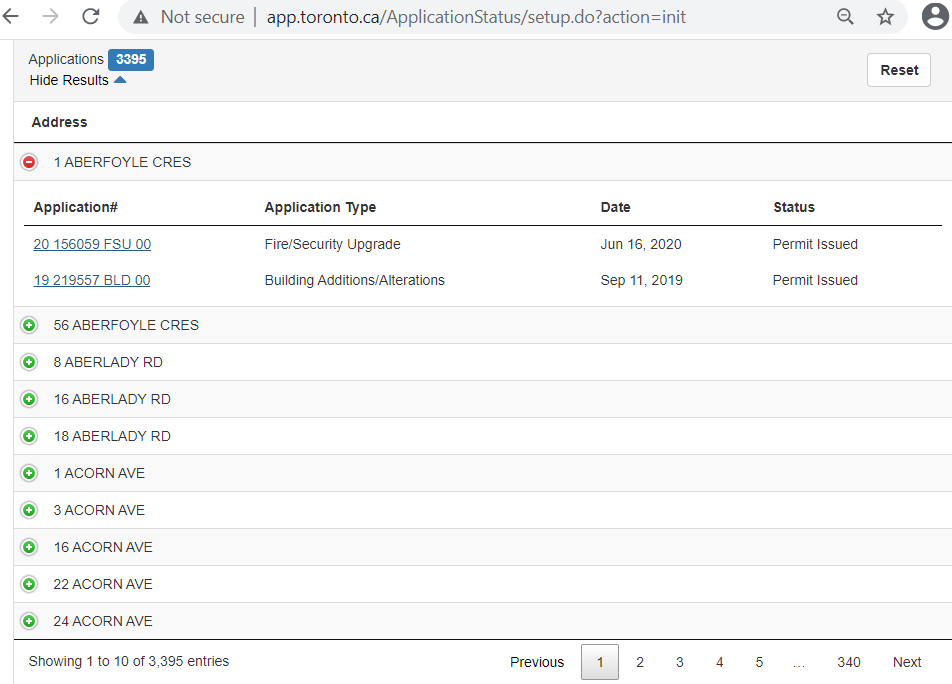
That's a lot of clicking! After all that, you still have to sift through for addresses where the permit type is "new house". This isn't practical to do by hand, but an easy task for a computer. As part of our new DIY Tech subseries, this blog will show you how to automate this process using computer code.
Tech Tools: Python with a sprinkle of HTML
For this DIY automation, you will use Python, but you will also need to understand a bit of HTML to get it to work.
Python
Python will be used to do most of the heavy lifting. The libraries you will need and the reason you will need them are as follows.
Selenium - automate the clicking on the City of Toronto's website
Webdriver-manager - connect to your Chrome browser
lxml - read HTML code
Pandas - extract data from the website and parse what is needed into Excel
If you haven't already installed the libraries, open the Command Prompt and type the following:
Correction: Instead of "pip install selenium" below, use "pip install selenium==3.141.0"

HTML
HTML stands for HyperText Markup Language. We won't go too much into the details, but here's what you need to know. Behind the scenes of a webpage is HTML code. Within the HTML code are elements. Elements could be anything on a webpage, such as a link, button, or dropdown. For the computer to know what element you want to click, you have to refer to it by its name, id, or any other description. These are called attributes. This is important because if you want to find a specific element to click on, you need to identify it by its attributes.
To view the HTML code of any element in your browser, simply right-click and select inspect as shown below. Feel free to play around and right-click to inspect other elements on the webpage to get a better sense of the HTML code used.
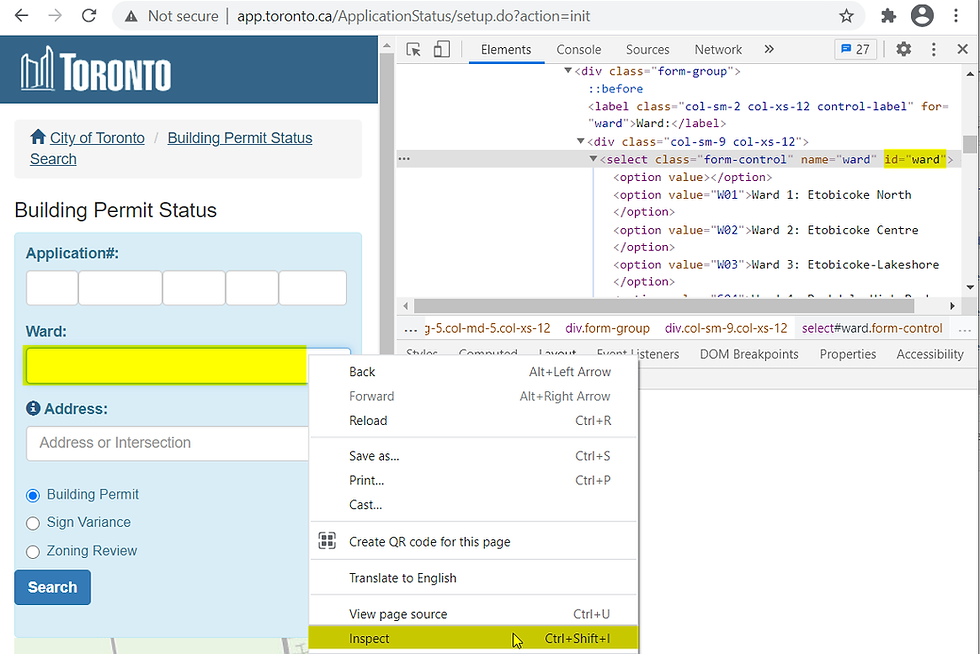
After inspecting the elements, you can see that some elements have the attribute id, some don't, and some have ids that change every time the page is refreshed. Finding elements by id is the most convenient way. But if that's not possible, you can also find elements in other ways such as XPath. This simply means that you can find elements by looking for patterns in the attributes. The pattern to look for is known as the XPath expression.
For this automation, the following chart shows the elements of interest, the corresponding HTML code, the best way to find the element, and the applicable XPath expression.

Now that you have the necessary tools in your tech toolbox, let's start automating!
Let's start coding in Python
To launch the Python environment where you will be writing and executing your code, type "python" in the Command Prompt as shown below.

Note: Even though you are using Command Prompt, all the code beyond this point will be inside the Python environment and not the Windows environment.
Now that you are inside Python, you can begin coding.
First, let's import the Python libraries you need
For any Python project, before you can use a library, you have to import it. Type the following import statements to import the libraries needed in this automation.
from selenium import webdriver
from selenium.webdriver.support.ui import Select
from webdriver_manager.chrome import ChromeDriverManager
import pandas as pd
import time
Once the libraries have been imported, you can start using Selenium to interact with a website.
Using Python's Selenium to interact with the web browser
Selenium is a Python library that allows you to connect to a browser and interact with a webpage entirely by code. Instead of manually clicking your mouse lots of times to get the data you want, Selenium offers powerful functions to automatically click buttons and select values.
Let's configure Python to interact with Chrome by typing the following.
driver = webdriver.Chrome(ChromeDriverManager().install())Next, navigate to the City of Toronto's building permit website.
driver.get("http://app.toronto.ca/ApplicationStatus/setup.do?action=init")Locate the ward dropdown.
ward = Select(driver.find_element_by_id('ward'))Select "Ward 3: Etobicoke-Lakeshore" from the list of dropdown values.
ward.select_by_value('W03')Locate and click the search button.
search_button = driver.find_element_by_id('submitButton')
search_button.click()
Wait 120 seconds for the website to load the results. We arbitrarily chose the wait time to be 120 seconds. This is a bit of a cheat. A better way is to wait for the actual time it takes to load, which we didn't do because it adds more complexity.
time.sleep(120)Once the results have loaded, locate and click the "Show Results" link.
results_link = driver.find_element_by_id('showResultsLink')
results_link.click()
So far, it was easy to find elements by id. Unfortunately, the elements you want to click now, do not have the id attribute. Another way is to find elements by XPath. The following are the XPath expressions you will use to select the table, table row, next page, and last page.
xpath_table = "//table[contains(@role,'grid')]"
xpath_row = "//tr[contains(@role,'row')]"
xpath_next = "//a[contains(@class,'paginate_button next')]"
xpath_last_page = "//a[contains(@data-dt-idx,'6')]"
The XPath expression in the xpath_last_page variable is used to determine the total number of pages. This is the number of times to instruct the code to click "next".
last_page = int(driver.find_element_by_xpath(xpath_last_page).text)Now that we automated the clicking using Selenium, you use Pandas to read the data.
Using Python's Pandas to read data from HTML webpage
Pandas is a Python library that allows you to manipulate and analyze data. This library offers something called a "DataFrame", which allows you to store data in a simple table with rows and columns. By using Pandas' read_html function, you can easily extract data from a website and store it in a table format.
Let's create an empty DataFrame with the desired column names.
df = pd.DataFrame(columns = ['Application', 'Application Type', 'Date', 'Status'])To extract the data, you need to first click on every address row. The most efficient way to code this is to use a “for loop” to repeat the clicking on each row until there are no more rows. Similarly, you need another “for loop” to repeat clicking each page until it reaches the last page. Once everything has been clicked, the building permit data can be extracted and stored into a data frame for further processing. The code below shows how the for loops are used. You may want to read up on Python loops, lists, and functions to get a better understanding.
#Extract data on every page and store in DataFrame
for page in range(last_page):
    row_list = driver.find_elements_by_xpath(xpath_row)

    #Click every address row to expand data in table
    for row in row_list:
        if row.get_attribute("class") == "odd" or
           row.get_attribute("class") == "even":
               #Click using Javascript
               driver.execute_script("arguments[0].click();", row)

    time.sleep(1)

    #Extract HTML from data table
    table_html = driver.find_element_by_xpath(xpath_table).get_attribute("outerHTML")

    #Read and store data into DataFrame
    dfs = pd.read_html(table_html)
    dfs[0].columns = ['Application', 'Application Type', 'Date', 'Status']
    df = df.append(dfs[0], ignore_index=True)

    #Click next page using Javascript
    next_page = driver.find_element_by_xpath(xpath_next)
    driver.execute_script("arguments[0].click();", next_page)
Next, we use Pandas to format the data to make it more readable.
Using Python's Pandas to format data and export to spreadsheet
Oftentimes, the data extracted isn't in the exact format you want. In this case, there are repeated headers and the address is displayed on a header row rather than as its own separate column. You can use the following Pandas functions to tidy up the data.
Delete unnecessarily repeated headers. These are rows that contain the word "Application".
discard = ["Application"]
df = df[~df.Application.str.contains('|'.join(discard))]
Insert a new column called "Address" to the leftmost position.
df.insert(0, 'Address', '')Populate the Address column with addresses from the Application column for rows where Status is null.
df['Address'] = df.loc[df['Status'].isnull(), 'Application']Fill down the Address column using the address from the previous row.
df['Address'] = df['Address'].ffill(axis = 0)Delete rows where the Status is null.
df = df[df['Status'].notna()]Export data to a spreadsheet.
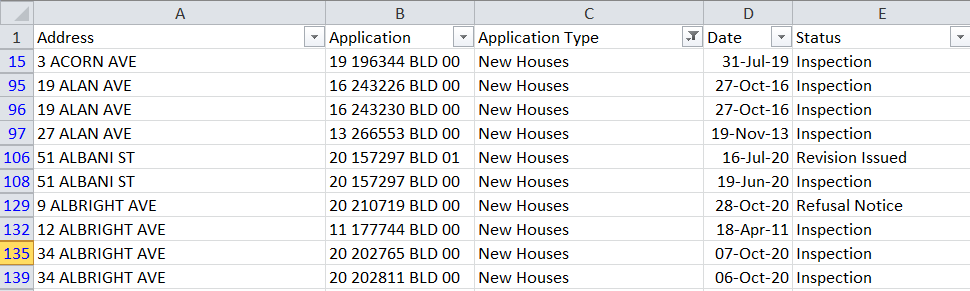
df.to_csv('permit.csv', index=False)Open the newly created "permit.csv" spreadsheet in Excel and you can further filter the data to identify addresses for new houses that are currently under construction.
Piecing the code together
By saving all of the above code into a .py file, you can run this file anytime without having to do a single click. You can run this automation script easily by double-clicking the permit.py file in your File Explorer. The entire script takes about 5 minutes to run. This would have been tedious and near impossible to do manually. The power of Python and the wide range of libraries available are incredibly powerful.
The entire code used in this blog can be downloaded below.
Ta-da, you did it!
If you made it this far in the blog and tried out the code, then kudos to you! We hope this was helpful. Although this code only works for one website, the basic concepts to inspect HTML elements, automate clicks using Selenium, and manipulate data using Pandas can apply to most other websites as well.
But most of all, you can now get a general idea of where new construction homes are being built, all by writing custom code in Python. How exciting is that!

Comments